This is the 6th blog post in a series about food preservation by HDFFA guest blogger, Mary Lowe. Mary has been a certified Master Food Preserver volunteer with Oregon State University Extension for 10 years and will be sharing up-to-date, research-based information and tips for safe food preservation at home. Happy preserving!

Fresh Oregon Strawberries
The arrival of Oregon grown strawberries is anticipated each year. Oregon strawberries are satisfyingly sweet and juicy unlike any other strawberry available at other times of the year. They are a great example of why we preserve foods. They arrive in late spring and then their season ends and they’re gone in just a couple of weeks. I try to remember to buy enough to eat fresh and have plenty left to preserve for enjoying later. It’s wonderful to enjoy a jar of strawberry jam in mid-January.
For this writing, I purchased a flat (12 pint containers) of fresh strawberries from a local open-air produce vendor. From that one flat, I dried 2 pints of strawberries, froze another 2 pints and made freezer jam from another 2 pints. Finally, I preserved traditional strawberry jam with the remaining 6 pints. From purchasing to completing the processing and clean-up took a total of 6 hours and I was able to return the box to the vendor at the end of the day.

Strawberries, washed & halved in the dehydrator.
Drying is the easiest way to preserve strawberries. Here’s a resource. The results can be used to munch on by themselves or add to a trail mix or your morning oatmeal. Just wash the strawberries gently in cool water, cut off the green tops and slice in half. Place skin side down on a dehydrator rack so the pieces don’t touch each other. Set the dryer’s temperature to around 135 degrees and let it run for at least 12 hours. An electric dehydrator makes a low hum so, I sometimes put the dehydrator outside while it’s working. Small electric dehydrators are inexpensive and available in a variety of styles at many retail outlets or online.
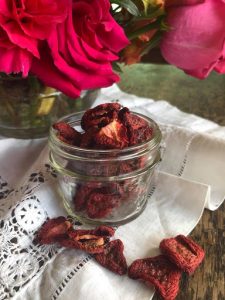
Dehydrated strawberries
The finished fruit should be leathery and pliable. No moisture droplets should form when fruit is squeezed. If it’s not dry enough yet, just start the dehydrator up again. Be sure to check often at this point as the drying process speeds up towards the end. I sometimes let strawberries dry until they are brittle. I’ve discovered that they can be blended into a powder that can be used as a coloring as well as a flavoring.
The advantages of drying foods are many. Dried foods weigh less and take up less room than other food preservation methods. If the food is stored in a cool, dark place, and has not been exposed to moisture or bugs, it can safely last indefinitely. The drying process itself is easy to do and takes very little electricity.
Freezing is another easy way to preserve strawberries. Here’s a resource. Make sure there is enough freezer space available and a consistent, unbroken source of electricity is also needed for long-term storage. There’s really nothing worse than losing a freezer full of produce because of an electrical failure. I once had such a loss because the wrong switch was flipped off in the garage where our freezer was. The mistake wasn’t discovered until a couple of weeks later. Frozen produce and game meat were a total smelly loss and the freezer had to be replaced as well. Live and learn.

Freezer Jam
Freezer jam is a quick way to make jam. Freezer jams usually do not require cooking. Often, freezer jam recipes use less sugar. Good, reliable recipes can be found on the box of pectin that’s purchased for jam making. Freezer jam recipes require added pectin. There are several brands of pectin available. Some commercial pectins are available that allow the use of less sugar or the use of other types of sweeteners besides sugar, such as honey or agave. Just read the label and plan ahead for your preferences.
Jam preserved in jars using the boiling water bath method is a great way to preserve many fruits. I prefer to use a recipe that’s only ingredients are fruit and sugar. Because I prefer not to use pectin, the cooking process takes longer. I enjoy the process but you may not have the time and prefer a different recipe.
Here’s a few tips for your canning. 1. When your jars are in the canner, remember to adjust the processing time (from the time the water starts to boil) for the altitude you live at. This should be listed in the recipe you are using or is a chart somewhere in the recipe book. 2. There are no processing times for using half or quarter pint jars, so use the time listed for pint jars. 3. Remove jars from the water bath using a jar lifter. It is not necessary to remove any water that may be pooled on top of the jar. You do not need to tilt the jar or blot the water off. Both of these procedures could endanger the seal. Sit the jars flat (not upside down) on a counter out of drafts and don’t move them for a day. While I’m cleaning up the kitchen I listen for and count the characteristic pop or ping of the seal forming on the jars.

Rosemary infused strawberry jam w/cream cheese and whole grain bread.
My daughters and I traveled together to Vancouver, BC a few years ago. It was a rare and delightful experience filled with light and laughter. One of my favorite memories was the tea and scones we enjoyed together for breakfast each morning at our hotel. The scones were served with clotted cream and rosemary infused strawberry jam. When making the jam for this writing, I separated out half of the mixture and simmered it with a sprig of fresh rosemary. I removed the rosemary sprig before putting the jam in little jars. Now, I can recreate that memory from our trip any time. In the picture here you can see I substituted cream cheese for clotted cream and instead of scones, I used a fresh loaf of rustic bread from a local bakery. It’s all good.
Enjoy making good food and making your own memories.